
....................................................................................
A very simple conversion to keep the detail in the sky:
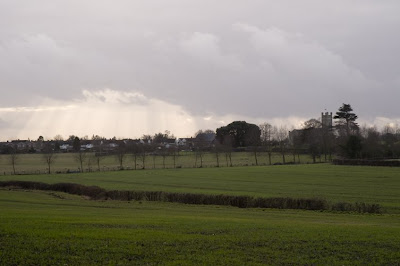
This was taken on a walk with a friend and her new dog who we have to get used to as we are likely to have her on their holidays. It is Rivenhall with the Church which constantly has a St George Flag at the top as opposed to Messing who take their flag up and down on certain days throughout the year and Geoff has to climb the tower to do it. I guess they have no-one to take theirs up and down and so they leave it up. However I am digressing.
We won’t go into the settings for Adobe Camera RAW but suffice to say that one was just about a normal setting without much adjustment. The other conversion I lowered the exposure and used the “add black sliders” for the sky.
1. I saved both versions as PSDs and opened them in PSCS3.
2. I used the sky version as the background layer and grabbed the lighter one and put on top of the background layer. The best way to do this is to just use the Arrow at the top of the toolbar then keep your finger on the ALT button and drag the lighter version on top of the sky version. This will centre it perfectly.
3. In the layers panel click on the first square at the bottom which has a round circle in it. It is next to the fx. This will Brng up a layer mask. Then you make sure the two squares at the bottom of the tool bar are black and white with black on top. There is a keyboard shortcut to do this but I can’t remember it. So if it is not like that click on the little version of it until you get the two main squares underneath with the black on top. The colour on top is always the one that will be used. Then click on the brush tool and choose quite a large size soft brush depending on how much sky you have and paint over it. This has the effect of erasing it. You may wonder why you don’t just use the erase tool but this method is good as if you go wrong you don’t merely have to hit undo but you can click on those squares again and get the white one on top and this will fill it all back in again. Comes in very useful for intricate work.
4. Once you have done the top bit you can fiddle around changing the size of the brush to get around nooks and crannies. But when you get to the bottom it is actually best to use quite a big brush bigger than a bottle top but reduce the opacity in the top bar to about 65ish then carefully go over the bottom bit. With a soft brush it does spread a bit outside of the area of the brush so just keep the brush in the sky and don’t go over the land. It is OK to go over tops of trees slightly.
5. That was all I did with this one Apart from Flattening the Layer when you are happy. One way of flattening the layer is to right click in the layers palette (sorry Mac lovers) and click flatten image. Of course you can also go to the top and scroll down under the Layer thingy and do the same thing.


