Saturday 29 August 2009

Multiple Exposure (Orton) [February]


This is a multiple exposure done for the purpose of Ortonizing, and also high key. Hosta Blossoms in white vase in bathtub. Never thought before of using bathtub for high key. (You can click on this to make it larger). I don't seem to have any difficulty with this blog. Oops, I spoke too soon. I've tried three times and can't move it to February! So sorry.

Friday 10 April 2009

Sandwich

I didn't have time to do it properly, this is just a sandwich of the
two, top and bottom.

MOTION BLUR FILTER and LAYER BLENDS

HAD TO POST THESE SEPARATELY AS I MESSED UP ON THE ORDER

The top image I have just redone the same way except I did motion blur over the whole picture and not selectively as in the image below.
This top one especially looks better when you click to make bigger.

I think it just looks out of focus in the small version.


The bottom image was my first attempt. I duplicated the layer of the original flower image below. Then transposed it by flipping it horizontally and vertically. I also made dups of layers and used the screen blend then merged it down and made another dup and another and used the multiply blend and merged down and then flattened it. These blends make them blend together so you can see both layers. The screen blend makes it light and the multiply blend makes it dark. Then I flattened it and messed about with the motion blur filter. I selectively blurred different parts of the picture separately

Motion Blur Filter

I'VE MESSED UP ON THE ORDER OF THESE PICS SO I WILL POST THEM SEPARATELY
Couldn't think why I liked this image. Probably it was just the colours. So I just messed about. Thought about putting it in Photique Themes under twos and threes but then I figured I could put it in here under filters since I used the Motion Blur filter.


Sunday 1 February 2009

Approaching Storm, multiple exposure

I just wanted to add this one. I liked the way your final one turned out except that I didn't like the shadows. Probly they don't have it in PS7 but one of my most favourite tools in CS is Shadows - Highlights. I have mine preset to how I prefer it and mostly it doesn't need any more adjustment. With this one I did give it a bit more light in the shadows but it only takes a second. I'd hate to lose that tool.

My first time of emailing to this blog. So hope it works and that you like it. I know that was not the object of the exercise and so you might have fixed the shadows anyhow if you'd had more time.

Approaching Storm, multiple exposures

I did mine in PS7, because that's the computer I was using.


1)the original
2)darkened for dark sky
3)lightened and slightly saturated for lighter foreground
4)vector mask applied to upper layer (the layer with the light sky) to
remove light sky. This is the FINAL* version.

I discovered sensor spots.


I cleaned up some of them.

*There is more I could do. But I have to go to bed--K is waiting for me.

This is how I did it: I pasted copies of the original into a new doc in PS7, darkened the lower one, lightened the upper one, applied the layer mask, colored black over the lightened sky with a large soft brush. (I did not drag it, dunno how).


The photo was taken in Hamilton, Ontario Canada in November.

FEBRUARY - MULTIPLE EXPOSURES .................(Top image is final combination)


....................................................................................
A very simple conversion to keep the detail in the sky:

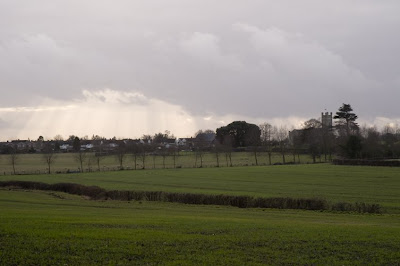
This was taken on a walk with a friend and her new dog who we have to get used to as we are likely to have her on their holidays. It is Rivenhall with the Church which constantly has a St George Flag at the top as opposed to Messing who take their flag up and down on certain days throughout the year and Geoff has to climb the tower to do it. I guess they have no-one to take theirs up and down and so they leave it up. However I am digressing.

We won’t go into the settings for Adobe Camera RAW but suffice to say that one was just about a normal setting without much adjustment. The other conversion I lowered the exposure and used the “add black sliders” for the sky.

1. I saved both versions as PSDs and opened them in PSCS3.
2. I used the sky version as the background layer and grabbed the lighter one and put on top of the background layer. The best way to do this is to just use the Arrow at the top of the toolbar then keep your finger on the ALT button and drag the lighter version on top of the sky version. This will centre it perfectly.
3. In the layers panel click on the first square at the bottom which has a round circle in it. It is next to the fx. This will Brng up a layer mask. Then you make sure the two squares at the bottom of the tool bar are black and white with black on top. There is a keyboard shortcut to do this but I can’t remember it. So if it is not like that click on the little version of it until you get the two main squares underneath with the black on top. The colour on top is always the one that will be used. Then click on the brush tool and choose quite a large size soft brush depending on how much sky you have and paint over it. This has the effect of erasing it. You may wonder why you don’t just use the erase tool but this method is good as if you go wrong you don’t merely have to hit undo but you can click on those squares again and get the white one on top and this will fill it all back in again. Comes in very useful for intricate work.
4. Once you have done the top bit you can fiddle around changing the size of the brush to get around nooks and crannies. But when you get to the bottom it is actually best to use quite a big brush bigger than a bottle top but reduce the opacity in the top bar to about 65ish then carefully go over the bottom bit. With a soft brush it does spread a bit outside of the area of the brush so just keep the brush in the sky and don’t go over the land. It is OK to go over tops of trees slightly.
5. That was all I did with this one Apart from Flattening the Layer when you are happy. One way of flattening the layer is to right click in the layers palette (sorry Mac lovers) and click flatten image. Of course you can also go to the top and scroll down under the Layer thingy and do the same thing.

Saturday 31 January 2009

Water Droplet Tutorials

I tried some water droplet pictures this morning, spend a bit of time at it, but the results aren't worth posting, So I did some research and here are some of my findings. (I am going to post these one at a time, feel free to add and comment.)

1) Dangling drops with flowers, ferns or other things inside

2)flat drops (on glass etc) with things inside

3)fast moving drops that fall into water etc and make crowns and so on.

4)water droplets on flower petals and leaves (these are the easiest, I think, but even these present some issues)

5)water droplets using PS

I've seen some of these on BP but haven't researched them yet there. Do add more if you find any good ones, especially for the topics not yet covered.

Thursday 15 January 2009

Orchid again with droplets added

OK, OK, I know this wasn't really what we were supposed to be doing,
but I had to try it for comparison.

1)This is the SAME orchid, and I left the bud in, but fiddled with the
edges of it using a clone stamp and smudge tool to "sharpen the edges
of the out-of-focus bud.

2)then I added fake water droplets like this: using the elliptical
marquis tool, I selected a shape and darked the bottom of it with the
burn tool and made a highlight with the dodge tool.

The Fake Water Drop technique #1

I tried the tutorial which I'd posted on January 31 for fake PS water drops. It's a video designed for making fake bubbles in beer or water droplets on the glass. They are a little too regularly and not round enough to look real. I fiddled with it way too much, using liquify to make some of the bubbles bigger--it wasn't worth all that trouble.

This is the same orchid I posted earlier--I cloned out the out-of-focus bud.